posted by MakeMaster at
9:13 PM
|
0 comments
![]()
![]()
Thursday, January 08, 2009
Sunday, May 07, 2006
The Art of Accurate Rubber Band Shots
It is surprisingly simple to accurately shoot a rubber band. This trick will let you launch a rubber band with pinpoint accuracy, a pleasing "swoosh", and satisfying velocity.
I learned this trick while working with five other engineers in a small field office trailer. A long labor strike finally put time in our hands, and someone left a very large box of rubber bands lying around. War soon broke out and one of the guys knew this trick. After being annihilated by his shooting ability, we plotted an ambush and finally got him to give up his secret.
The Secret Technique: Differential Tension. When the rubber band is pulled back, one side of the loop is tighter than the other. Launching causes the loop to spin, and I surmise the spin has the effect of a gyroscopic guidance system. The rubber band takes a straight and true path with a very high velocity.
Here are the steps to shoot a rubber band:
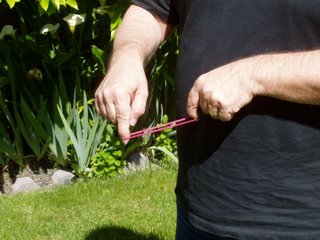 1. Put both pointer fingers inside the loop, with the right pointer forward and the left pointer closest to your body. To do this, both fingers point to the floor and the fingernails are facing away from your body.
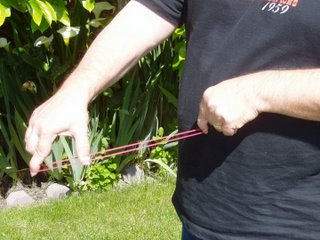 2. Stretch the rubber band, keeping the left hand still and pulling the right hand away from your body. Note both sides of the loop have equal tension.
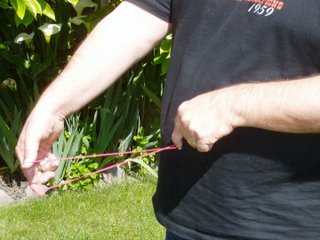 3. Now place your right thumb in the center of the loop. Push the left side of the loop with your right thumbnail, and rotate your right hand clockwise. This causes the rubber band tension to transfer from your right pointer on to your right thumb. It also causes the left side of the loop to have greater tension than the right side.
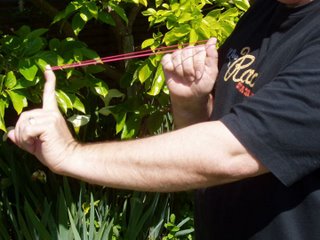
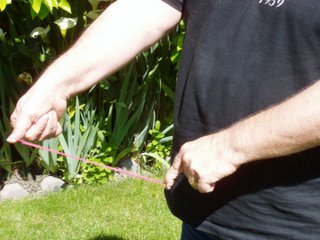 4. Simultaneously, roll your left hand forward and the right hand back towards your body. This quick, slick movement sets the rubber band ready to aim. Your hands should now be set to shoot with both the left pointer and the right thumb now pointing upwards. The forward end of the rubber band is resting on your left pointer finger pad.
 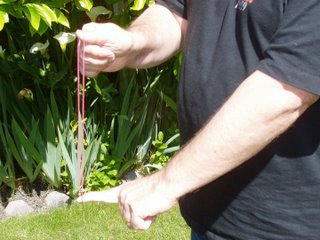 The back end of the rubber band will be tensioned with your right thumbnail, tilted slightly back from vertical so that it will not slip off your thumb. Your hands are about shoulder high.
 5. Launch the rubber band with a quick flick forward with the left pointer and a simultaneous release of the rubber band from the right thumbnail. The quick flick will get the tip of your left pointer out of the way as the rubber band is launched. It also gives the rubber band its final aim, so the flick should follow thru by pointing at the target.
CAUTION: What would your mother say? "You're going to put an eye out!" Remember; do not sight down the rubber band. Backfires are common and with the velocity of this technique, you will get stung in the face or eye! Keep the rubber band no higher than shoulder high. Practice the flick aim, and you will be surprised how quickly you become accustomed to launching rubber bands this way and how accurate you get with your "aim.”
Look for high quality rubber bands at office supply stores. There are lots of different size rubber bands, but I particularly like one I call the "Magnum". It is a powerful 6" long x 1/8" high tension force loop. I've launched one at least 30 feet and ripped a sheet of paper hanging on the wall. And yes, it was the target I aimed at.
I learned this trick while working with five other engineers in a small field office trailer. A long labor strike finally put time in our hands, and someone left a very large box of rubber bands lying around. War soon broke out and one of the guys knew this trick. After being annihilated by his shooting ability, we plotted an ambush and finally got him to give up his secret.
The Secret Technique: Differential Tension. When the rubber band is pulled back, one side of the loop is tighter than the other. Launching causes the loop to spin, and I surmise the spin has the effect of a gyroscopic guidance system. The rubber band takes a straight and true path with a very high velocity.
Here are the steps to shoot a rubber band:
 1. Put both pointer fingers inside the loop, with the right pointer forward and the left pointer closest to your body. To do this, both fingers point to the floor and the fingernails are facing away from your body.
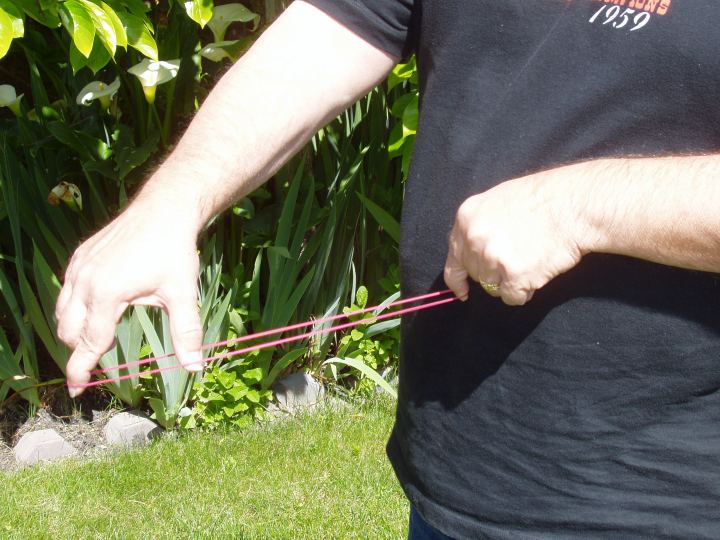 2. Stretch the rubber band, keeping the left hand still and pulling the right hand away from your body. Note both sides of the loop have equal tension.
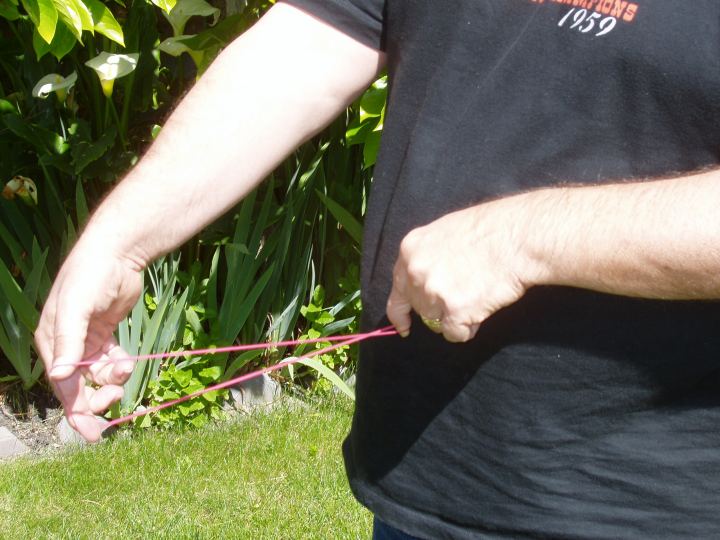 3. Now place your right thumb in the center of the loop. Push the left side of the loop with your right thumbnail, and rotate your right hand clockwise. This causes the rubber band tension to transfer from your right pointer on to your right thumb. It also causes the left side of the loop to have greater tension than the right side.4. Simultaneously, roll your left hand forward and the right hand back towards your body. This quick, slick movement sets the rubber band ready to aim. Your hands should now be set to shoot with both the left pointer and the right thumb now pointing upwards. The forward end of the rubber band is resting on your left pointer finger pad.
  The back end of the rubber band will be tensioned with your right thumbnail, tilted slightly back from vertical so that it will not slip off your thumb. Your hands are about shoulder high.
 5. Launch the rubber band with a quick flick forward with the left pointer and a simultaneous release of the rubber band from the right thumbnail. The quick flick will get the tip of your left pointer out of the way as the rubber band is launched. It also gives the rubber band its final aim, so the flick should follow thru by pointing at the target.
CAUTION: What would your mother say? "You're going to put an eye out!" Remember; do not sight down the rubber band. Backfires are common and with the velocity of this technique, you will get stung in the face or eye! Keep the rubber band no higher than shoulder high. Practice the flick aim, and you will be surprised how quickly you become accustomed to launching rubber bands this way and how accurate you get with your "aim.”
Look for high quality rubber bands at office supply stores. There are lots of different size rubber bands, but I particularly like one I call the "Magnum". It is a powerful 6" long x 1/8" high tension force loop. I've launched one at least 30 feet and ripped a sheet of paper hanging on the wall. And yes, it was the target I aimed at.
posted by MakeMaster at
4:28 PM
|
0 comments
![]()
![]()
Thursday, May 04, 2006
Laser Engraved Plexiglas Logo
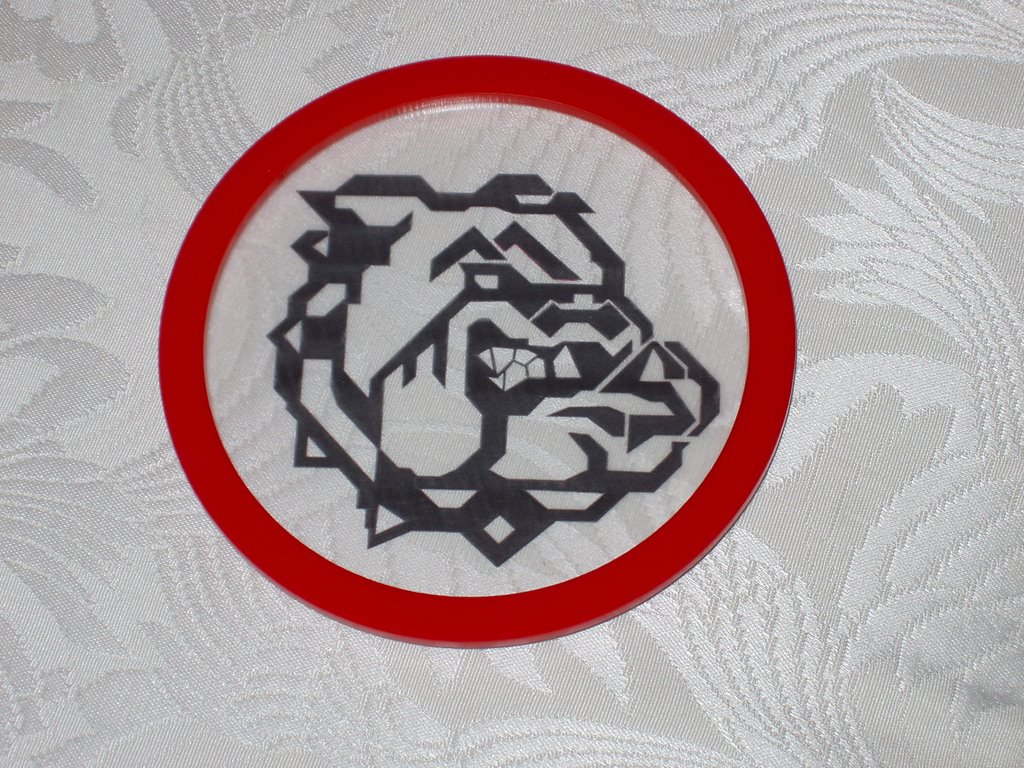 Laser engraved Bulldog Logo for the Mexico High School Football Team in Mexico, Missouri. The logo was designed to be inserted in the cover of a sports jersey display case.
Clear cast acrylic is engraved and then the engraving was color filled with black liquid shoe polish. A 1/8" thick red plastic ring was cut and glued to the engraved logo. This allowed a display cover to be cut and the Logo and flange to be dropped in to the hole and glued. The flange neatly hides the hole cut.
Getting the Logo.
Fist a paper copy of the logo was scanned and inserted into Corel Draw. The logo was traced with vector lines over the outside edges of the scanned logo and the logo was filled with black. The logo scan was erased and the vectorized logo was checked against the paper copy for accuracy. Circles were drawn around the logo for the cut of the logo and the cover ring flange.
Engraving and cutting.
The laser was setup with clear 1/8" thick acrylic. The filled areas of the logo were used to raster engrave the acrylic approximately 1/32" deep. The circle around the logo was vector cut to produce the disc of acrylic with the logo engraved into it.
The acrylic was changed to 1/16" thick red to match the school colors. Two vector cuts created the flange ring.
Coloring the Logo.
I used liquid shoe polish to color the logo. First, a thin coat was rubbed into the logo and the unengraved surface was wiped clean. After a second coat was applied and the unengraved surface was wiped clean. The logo was left to dry. Both the logo and the red ring were thoroughly cleaned and polished.
Welding the Ring to the Logo.
The red ring was set face down and the logo placed face down onto the ring. The logo was adjusted to be concentric with the red ring. Acrylic solvent was loaded on to the hypodermic welding nozzle, and carefully drawn the outer edge of the logo. You will see the solvent drawn between the logo and red ring due to capillary action. Nearly the entire contact surface will fill with the solvent. Let the parts rest and in a short time the solvent dissolves the two surfaces and the parts weld together.
Mounting the Logo
The logo is mounted into the acrylic cover of a jersey display frame. Measure the logo disk size and cutout a hole in the frame cover slightly larger positioned where you want it. Clean up the cut edges and polish the cover. Place the logo into the cove and hold in place with masking tape. Turn the cover over so that the logo is underneath the cover. Carefully solvent the logo ring to the cover. To keep the solvent from marring the cover, weld thru the joint between the logo and the cover. This should prevent the solvent from flowing out past the red ring and showing on the cover or the logo.
posted by MakeMaster at
10:14 PM
|
0 comments
![]()
![]()
Wednesday, May 03, 2006
This blog is for everyone interested hand made, hand built projects. We'll build a blog to describe interesting and useful projects.
Making something and building something also involves learning and discovery. This blog is also a place for discovery. Discover new ideas, clever concepts and the satisfaction of knowing how to do something yourself.
Have and appetite for discovery? Take a few bytes. Bon Appétit, now we may discover!
posted by MakeMaster at
8:44 PM
|
0 comments
![]()
![]()
